Data | Domains
Masterclass "Real-world machine learning" at UVA 
Walter van der Scheer 11 Apr, 2016


It is said that in most Data Science solutions, 80 percent of the work is engineering data preparation and only 20 percent is spent on actual modelling and algorithms. Your mileage may vary. Another observation is that when there is a need for near realtime processing, the engineering gets even harder (and often the machine learning models simpler). Let me illustrate this with a an architectural overview of a typical web optimisation setup:
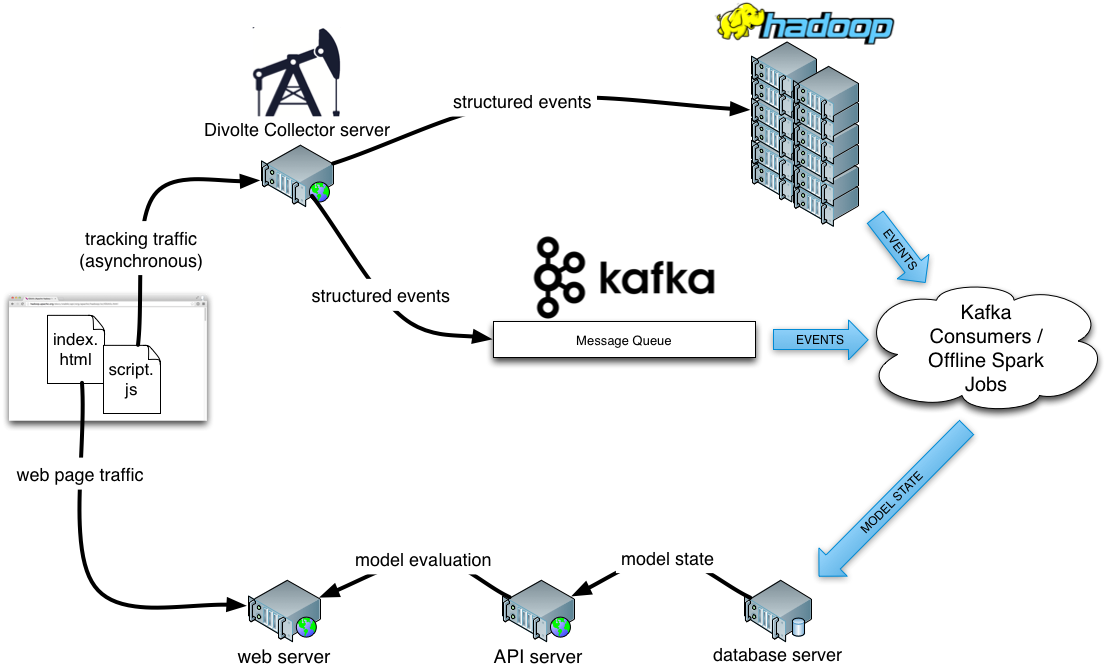
Let’s disect this a bit:
That’s a lot of moving parts! If we need to build all of this in order to do something seemingly simple, such as draw a random sample from a number of parameterized distributions (i.e. multi-armed bandit optimization) or perform a classification using a pre-trained classifier, we’d hardly ever get anything done. For this reason at GoDataDriven we focus on setting up this kind of infrastructure once and try to make it generic enough to implement different types of applications on top of it. This is also the reason we invest in building Divolte Collector; it solves a very important engineering problem for companies that operate high-volume website.
In this post, we’ll have a look at implementing a prototype multi-armed bandit optimization using this stack with minimal Python code and a Redis database for model state. We will use Divolte Collector to provide us with near realtime clickstream data.
At GoDataDriven we internally use a little fake web shop application for demo purposes. We call it the Shop for Humans. At the Shop for Humans, you can "buy" photos for which you "pay" by solving a series of CAPTCHA’s; hence the Shop for Humans, not bots. The shop delivers the photos by just providing you with the direct links to the source after you complete the checkout procedure (which can be quite tedious, as CAPTCHA’s are involved). The photos in the shop are taken from Flickr. Just to be clear: no we don’t sell other people’s photos on the internet; we just use some photos for an internal demo application. All the photos are filtered to have commercially friendly Creative Commons licensing and there is proper attribution.
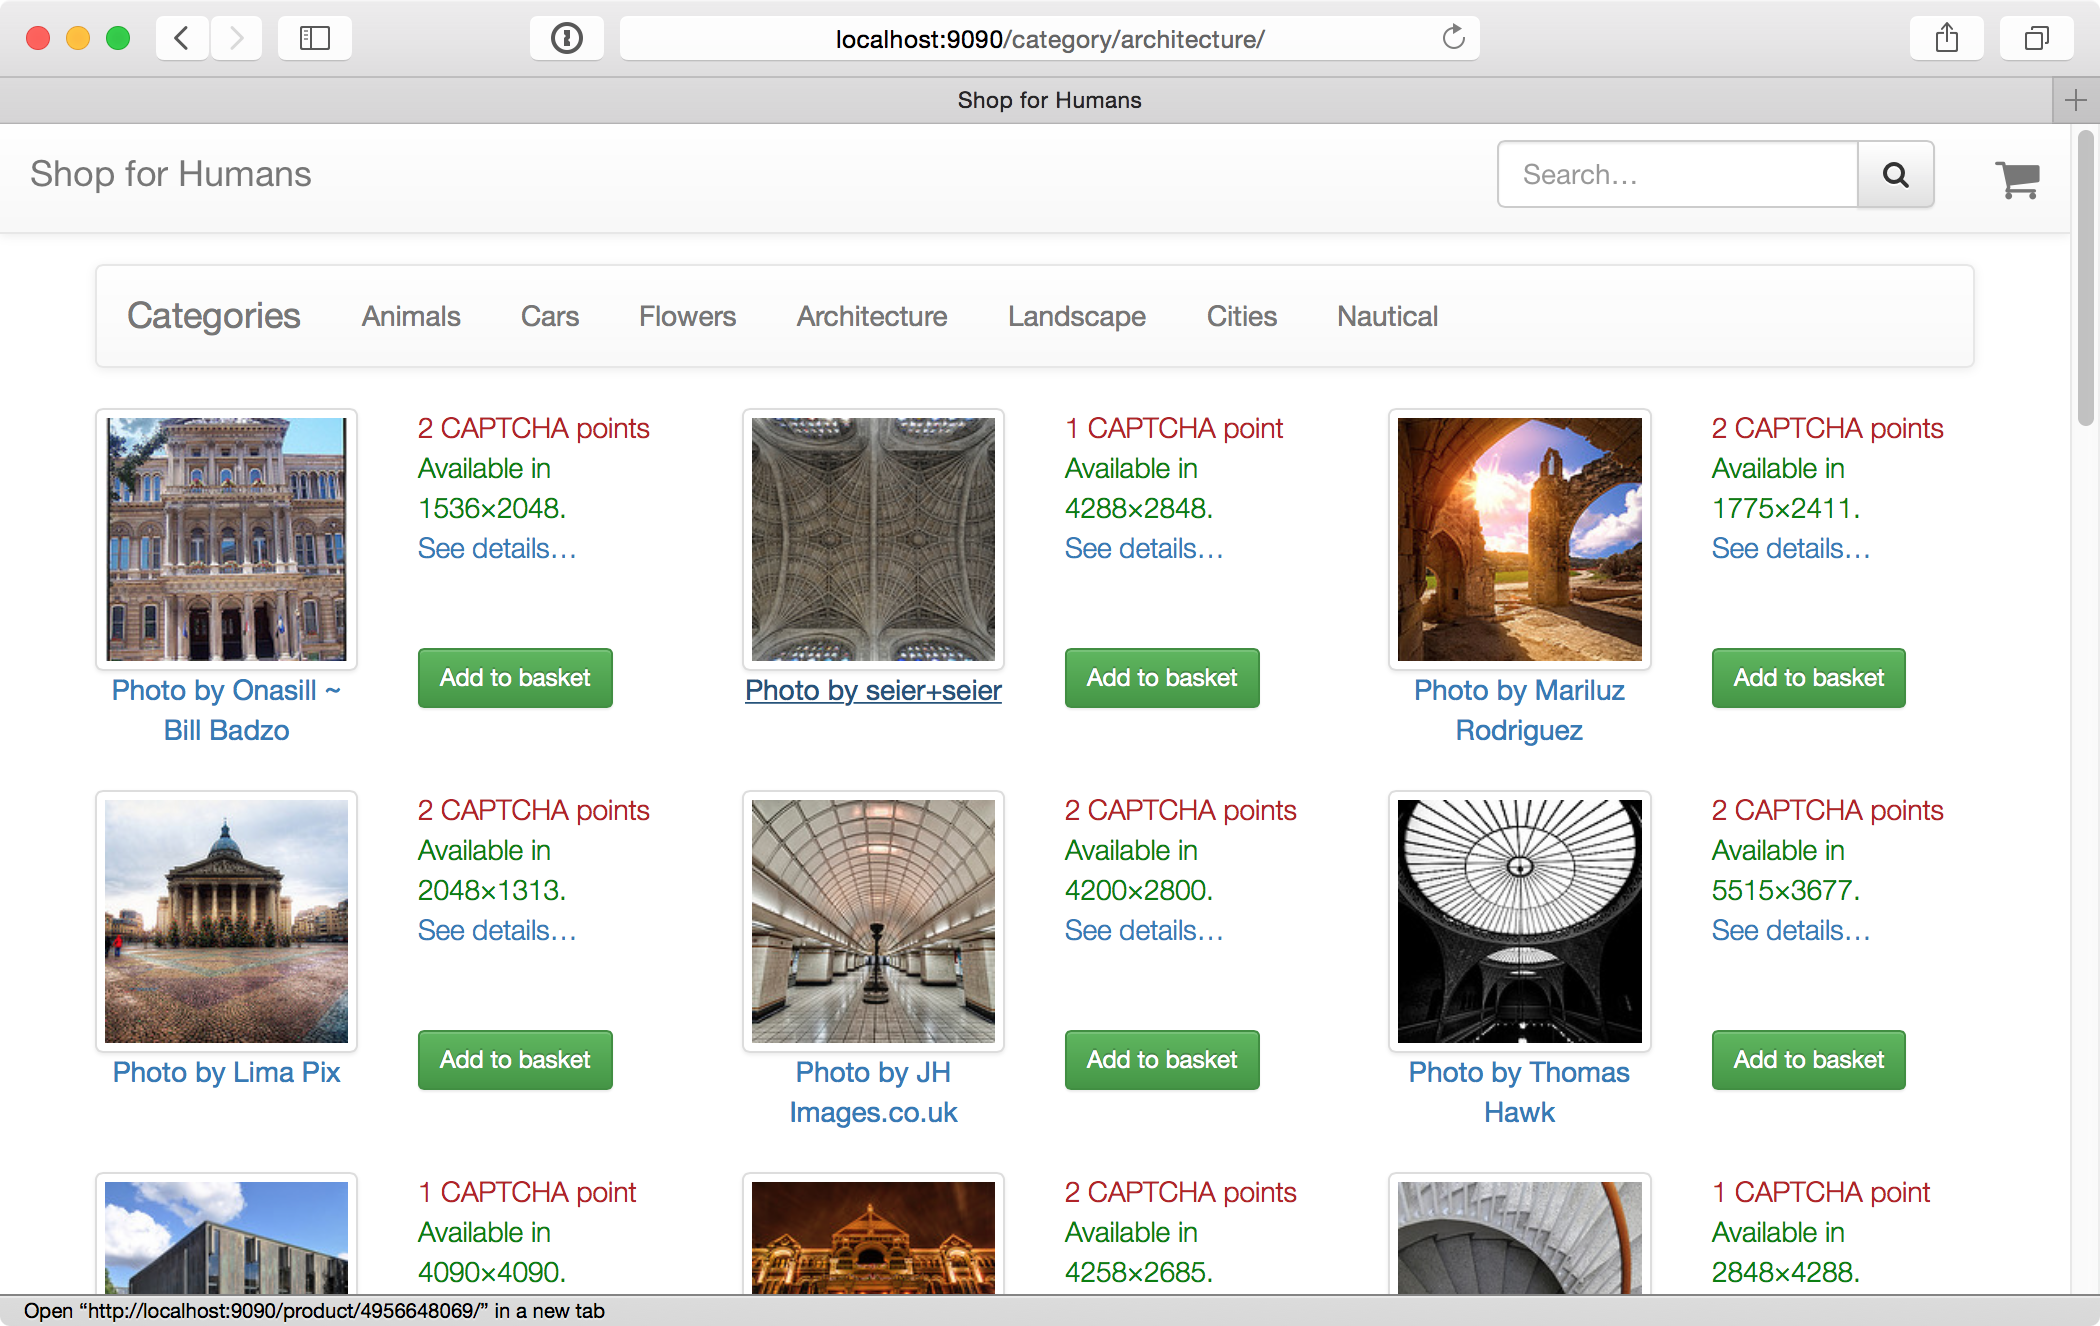
For humans. No bots allowed.
On the homepage of the web shop, we’d like to display one featured image. Instead of just picking a random image from the catalog or hand-picking this image, we’d like to pick which image to displayed by using a popular Bayesian approach to multi-armed bandit optimisation often called Bayesian bandits.
We can use the Bayesian bandit approach to selecting one photo from a set of photos for display on the homepage. The Bayesian bandit algorithm works by continuously updating priors about click-through for each item and then taking a sample from this set of prior distributions and display the photo for which the sample value is largest. Concretely, whenever we serve the homepage with one of the images, we increment a impression counter for that image. Then, we check if there is a click-through on this image. If so, we increment a click through counter for that image. When we want to pick an image for the homepage, for each image we take a sample from a Beta distribution with parameters alpha equal to the number of click-throughs for that image and beta equal to the number of times we’ve shown that image thusfar. The image with largest sample value wins. You can find reasonable explanations of this concept here and here.
Because we have a lot of images in our catalog and we might not get enough visitors to figure out which one is best from all the images that exist, we want to use a limited set of images to run the optimisation on. We also want to change this set of images every now and then, to further explore the complete catalog. In order to do this, we use the following method:
The idea here is that we keep top performing images and discard the less performing images in favor of exploring further in the catalog. After refreshing the image set, we assign equal priors to all images again. This model should be simple enough to implement in Python. Ideally, it should take about a day of work to build this, test it and put it in production.
So, we need to put an image on the homepage and have it be clickable. Also, we need to make sure we can keep track of the click-through for this image. To prototype the UI and take care of the capturing the proper events, we start out by just putting a fixed image on the homepage.
Our shop is written in Python and uses Tornado. The image metadata is stored in ElasticSearch, which we abstract away with a little service written in Java. The shop back end isn’t really important for our prototype. It should generally be easy enough to include an arbitrary product from the catalog on a homepage. In our shop, the handler code for this is this:
    class HomepageHandler(ShopHandler):
      @coroutine
      def get(self):
          # Hard-coded ID for a pretty flower.
          # Later this ID will be decided by the bandit optmization.
          winner = '15442023790'

          # Grab the item details from our catalog service.
          top_item = yield self._get_json('catalog/item/%s' % winner)

          # Render the homepage
          self.render(
              'index.html',
              top_item=top_item)
The accompanying template for rendering the homepage includes this:
    div class="col-md-6">
      h4>Top pick:h4>
      p>

        a href="/product/{{ top_item['id'] }}/#/?source=top_pick">
          img class="img-responsive img-rounded" src="{{ top_item['variants']['Medium']['img_source'] }}">

          script>divolte.signal('impression', { source: 'top_pick', productId: '{{ top_item['id'] }}'})script>
        a>
      p>
      p>
        Photo by {{ top_item['owner']['real_name'] or top_item['owner']['user_name']}}
      p>
    div>
Here’s the new homepage:
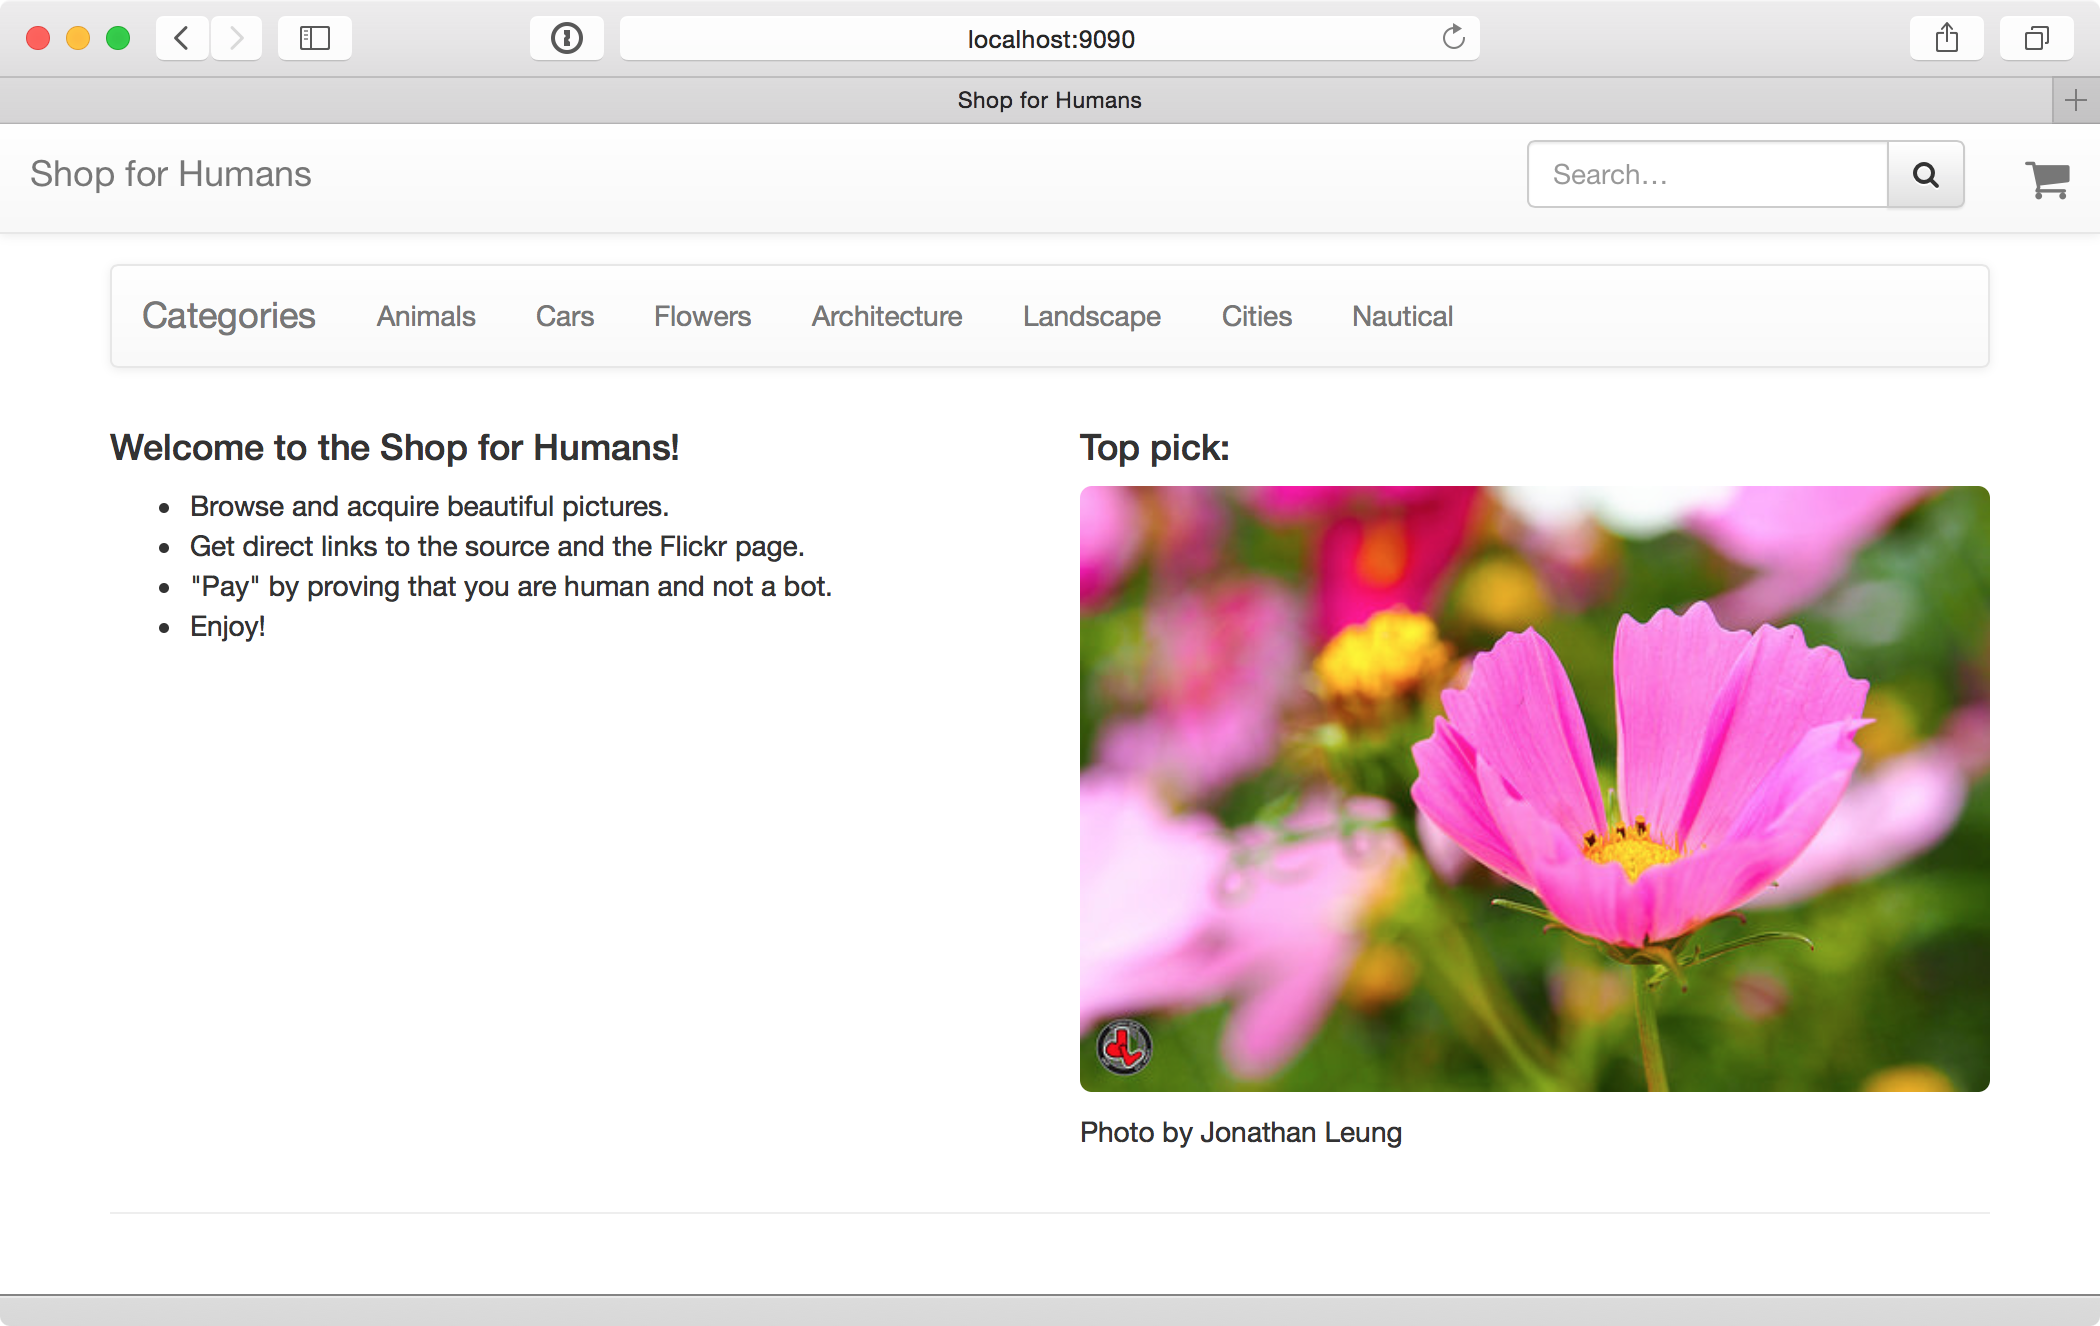
Shop for Humans, brought to you by bandits. Photo by Flickr user Jonathan Leung.
Note that we conclude the href URL with this little suffix: #/?source=top_pick. Also, we send a custom Divolte Collector event to signal that an impression of the image was served. We are going to use this to capture the events of impression and click-through. We use a URL fragment (the part after the #), so we don’t bother the server side code with this tracking. Instead, we capture the URL fragment in the Divolte Collector mapping and populate a special field in our event records when it is present. Same for the custom impression event. In Divolte Collector event records are Avro records, which are populated from incoming requests according the a specific mapping which you specify in a Groovy based DSL. Please have a look at the mapping documentation for more details on this (or read our Getting Started guide).
In our event record schema, we add the following field to capture the source of a click:
    {
      "name": "source",
      "type": ["null", "string"],
      "default": null
    }
Subsequently, we need to tell Divolte Collector about this field and how to populate it. In the mapping we will use the URL fragment to parse out the source parameter. Note that the fragment we add uses URL syntax for specifying this field; the source is just a query parameter. Here’s the mapping required to get this piece of data into our records:
    def locationUri = parse location() to uri
    when eventType().equalTo('pageView') apply {
      def fragmentUri = parse locationUri.rawFragment() to uri
      map fragmentUri.query().value('source') onto 'source'
    }

    when eventType().equalTo('impression') apply {
      map eventParameters().value('productId') onto 'productId'
      map eventParameters().value('source') onto 'source'
    }
That’s it. Data collection is setup. We can now start learning…
We are going to create a Kafka consumer in Python that consumes the events and updates our model state. The model state consists of a series of counters for clicks and impressions of each item. Also, we update a global counter for the number of experiments that were conducted thusfar, so we know when to refresh the item set.
Redis is more than just a key-value store; it allows to store and modify several data structures that quite often are useful in keeping track of different types of interactions. In our case, we will use a single hash data structure, which is basically a hashmap stored in Redis. Our hash will look as follows:
    {
      'c|14502147379': '2',
      'c|15106342717': '2',
      'c|15624953471': '1',
      'c|9609633287': '1',
      'i|14502147379': '2',
      'i|15106342717': '3',
      'i|15624953471': '2',
      'i|9609633287': '3'
    }
Here the keys in the hash are a special prefix followed by an item ID. The prefix is to make the distinction between clicks and impressions; the item ID identifies the image in the set. Whenever we serve an image on the homepage, we want to increment the impression counter for that image and when an image is clicked on the homepage, we want to increment the click counter for that image. In Redis, we use the HINCRBY command to achieve this. When we need to select one of the images, we can retrieve the entire set of counters from Redis with the HGETALL command. One benefit of this layout in Redis is that we can fetch all required model state for evaluation in one single round-trip.
Creating a Kafka consumer in Python is pretty straightforward and requires pleasantly little boilerplate code. We use the kafka-python package for this. It is possible to run multiple consumers and have consumers spawn multiple processes, utilizing multiple cores on one or more machines. The code for this is only trivially different from the single threaded version below.
For access to Redis, we use the recommended Redis client for Python. Because the messages created by Divolte Collector are serialized using Avro, we also use Avro’s Python package for deserializing the records.
Here is the meat of our consumer code:
    def start_consumer(args):
        # Load the Avro schema used for serialization.
        schema = avro.schema.Parse(open(args.schema).read())

        # Create a Kafka consumer and Avro reader. Note that
        # it is trivially possible to create a multi process
        # consumer.
        consumer = KafkaConsumer(args.topic, client_id=args.client, group_id=args.group, metadata_broker_list=args.brokers)
        reader = avro.io.DatumReader(schema)

        # Consume messages.
        for message in consumer:
            handle_event(message, reader)

    def ascii_bytes(id):
        return bytes(id, 'us-ascii')

    def handle_event(message, reader):
        # Decode Avro bytes into a Python dictionary.
        message_bytes = io.BytesIO(message.value)
        decoder = avro.io.BinaryDecoder(message_bytes)
        event = reader.read(decoder)

        # Event logic.
        if 'top_pick' == event['source'] and 'pageView' == event['eventType']:
            # Register a click.
            redis_client.hincrby(
                ITEM_HASH_KEY,
                CLICK_KEY_PREFIX + ascii_bytes(event['productId']),
                1)
        elif 'top_pick' == event['source'] and 'impression' == event['eventType']:
            # Register an impression and increment experiment count.
            p = redis_client.pipeline()
            p.incr(EXPERIMENT_COUNT_KEY)
            p.hincrby(
                ITEM_HASH_KEY,
                IMPRESSION_KEY_PREFIX + ascii_bytes(event['productId']),
                1)
            experiment_count, ingnored = p.execute()

            if experiment_count == REFRESH_INTERVAL:
                refresh_items()
The next interesting bit is refreshing the item set. Here we need to be a bit careful, because we are going to reset all the state in Redis and create a new set of items. Because there are potentially multiple clients accessing Redis at the same time, we must make sure to perform the writing operations in a transaction. Luckily, Redis has support for these as part of its request pipelining support. For drawing samples from random distributions, we use Numpy.
    def refresh_items():
        # Fetch current model state. We convert everything to str.
        current_item_dict = redis_client.hgetall(ITEM_HASH_KEY)
        current_items = numpy.unique([k[2:] for k in current_item_dict.keys()])

        # Fetch random items from ElasticSearch. Note we fetch more than we need,
        # but we filter out items already present in the current set and truncate
        # the list to the desired size afterwards.
        random_items = [
            ascii_bytes(item)
            for item in random_item_set(NUM_ITEMS + NUM_ITEMS - len(current_items) // 2)
            if not item in current_items][:NUM_ITEMS - len(current_items) // 2]

        # Draw random samples.
        samples = [
            numpy.random.beta(
                int(current_item_dict[CLICK_KEY_PREFIX + item]),
                int(current_item_dict[IMPRESSION_KEY_PREFIX + item]))
            for item in current_items]

        # Select top half by sample values. current_items is conveniently
        # a Numpy array here.
        survivors = current_items[numpy.argsort(samples)[len(current_items) // 2:]]

        # New item set is survivors plus the random ones.
        new_items = numpy.concatenate([survivors, random_items])

        # Update model state to reflect new item set. This operation is atomic
        # in Redis.
        p = redis_client.pipeline(transaction=True)
        p.set(EXPERIMENT_COUNT_KEY, 1)
        p.delete(ITEM_HASH_KEY)
        for item in new_items:
            p.hincrby(ITEM_HASH_KEY, CLICK_KEY_PREFIX + item, 1)
            p.hincrby(ITEM_HASH_KEY, IMPRESSION_KEY_PREFIX + item, 1)
        p.execute()
And in case you are wondering how to fetch a random set of documents from ElasticSearch, here’s how. We choose not to use the official ElasticSearch client, but just use the Python requests package to do the HTTP call ourselves. The official client can have some benefits for more complex use cases, though.
    def random_item_set(count):
        query = {
            "query": {
                "function_score" : {
                "query" : { "match_all": {} },
                    "random_score" : {}
                }
            }, "size": count
        }

        result = requests.get('http://%s:%s/catalog/_search' % (es_host, es_port), data=json.dumps(query))
        return [hit['_source'] for hit in result.json()['hits']['hits']]
That’s all we need on the Kafka consumer side of things. This code consumes click events and updates our required model state in Redis. There’s some minimal boilerplate for things like argument parsing. You can find the full listing for the Kafka consumer here: consumer.py.
To create the API for our model, we need to fetch the currently active item set from Redis and all associated click-through counts. Then we sample from the distributions and return whichever item came up with the largest sample value.
An important aspect of this entire setup is that the API code is completely decoupled from the learning code; model training and model evaluation are separate. Separating these allows us to scale them independently and also allows us to tweak and update the model training without taking the system off line from a user’s perspective.
We once more use Tornado for creating this API. Here is the handler code for our bandit API:
    class BanditHandler(web.RequestHandler):
        redis_client = None

        def initialize(self, redis_client):
            self.redis_client = redis_client

        @gen.coroutine
        def get(self):
            # Fetch model state.
            item_dict = yield gen.Task(self.redis_client.hgetall, ITEM_HASH_KEY)
            items = numpy.unique([k[2:] for k in item_dict.keys()])

            # Draw random samples.
            samples = [
                numpy.random.beta(
                    int(item_dict[CLICK_KEY_PREFIX + item]),
                    int(item_dict[IMPRESSION_KEY_PREFIX + item]))
                for item in items]

            # Select item with largest sample value.
            winner = items[numpy.argmax(samples)]

            self.write(winner)
Requesting <a href="http://localhost:8989/item"><a href="http://localhost:8989/item">http://localhost:8989/item</a></a> gives us this:
    HTTP/1.1 200 OK
    Content-Length: 11
    Content-Type: text/html; charset=UTF-8
    Date: Tue, 07 Apr 2015 11:37:50 GMT
    Server: TornadoServer/4.1

    14502147379
Another nice property of decoupling model updates from the serving API, is that calling the API doesn’t increment the impression counters. We can call the endpoint as much as we like for testing purposes, without influencing the feedback cycle.
Next, in the web shop code, we use Tornado’s asynchronous HTTP client to fetch an item every time we serve the homepage.
    class HomepageHandler(ShopHandler):
        @coroutine
        def get(self):
            http = AsyncHTTPClient()
            request = HTTPRequest(url='http://localhost:8989/item', method='GET')
            response = yield http.fetch(request)
            winner = json_decode(response.body)
            top_item = yield self._get_json('catalog/item/%s' % winner)

            self.render(
                'index.html',
                top_item=top_item)
This solution is about 200 lines of Python code, including boilerplate for argument parsing, setting up the Tornado server and IO loop and setting up the Kafka consumer. The total amount of engineering work that went into this, however, is orders of magnitude larger. It involves setting up Kafka clusters, managing web servers, load balancers, Divolte Collector servers, Hadoop clusters, ElasticSearch and much more. When all of these moving parts are in place though, it becomes relatively painless to rapidly create a prototype online machine learning solution with an API. This allows us to focus on the model code and the user experience over re-inventing all of the groundwork for each solution individually. If you think about data collection and the availability of data upfront, you gain a lot of engineering agility and with that a better position to move technology solutions to where the business is. When building web systems, don’t make data collection an afterthought.
Divolte Collector is helpful in this scenario as in many cases it allows us to add additional data collection and feedback without tampering with server side code or complex log file parsing.
The model that we use in this example is intentionally simple. Here are some thoughts on improving it further:
Obviously, I will leave the above as an exercise to the reader…
With some minor additions, yes. The code doesn’t do any error handling. We would typically wrap these things in some kind of process monitoring tool (e.g. supervisord or monit), to both alert us and to restart it when it breaks.
Additionally, we would need to make sure that when the bandit API is not available for whatever reason, the front-end would be able to cope with this, preferably rendering a different page without the top pick.
That said, we very often have short stints of Python code like this in production deployments for some amount of time to see if something works. You want to get to the prototype stage as soon as possible, so you can test things on actual users. We put a lot of effort into building infrastructure and data pipelines that allow us to build these prototypes very quickly and reliably, so it would be a waste not to use that opportunity.
Not very. Computers are fast and cheap. For many problems it’s not how efficiently you use them, but how effectively you use them.
To provide some sort of a benchmark, we run the entire shop stack on a virtual machine on my laptop. This includes: Java based service, ElasticSearch, Redis, Kafka, Zookeeper, Divolte Collector, Kafka consumer and the Bandit service. Then we run ApacheBench against a couple of things. Below is the output for the service. Keep in mind that this is an internal service, so it’s reasonably representative to run with keep-alive on and a concurrency of only 8. Also note that the errors reported by ApacheBench are actually because it expects all request to return exactly the same content, which it obviously doesn’t; there are no real errors.
    [root@localhost ~]# ab -k -c8 -n10000 http://127.0.0.1:8989/item
    This is ApacheBench, Version 2.3
    Copyright 1996 Adam Twiss, Zeus Technology Ltd, http://www.zeustech.net/
    Licensed to The Apache Software Foundation, http://www.apache.org/

    Benchmarking 127.0.0.1 (be patient)
    Completed 1000 requests
    Completed 2000 requests
    Completed 3000 requests
    Completed 4000 requests
    Completed 5000 requests
    Completed 6000 requests
    Completed 7000 requests
    Completed 8000 requests
    Completed 9000 requests
    Completed 10000 requests
    Finished 10000 requests

    Server Software:        TornadoServer/4.1
    Server Hostname:        127.0.0.1
    Server Port:            8989

    Document Path:          /item
    Document Length:        11 bytes

    Concurrency Level:      8
    Time taken for tests:   6.306 seconds
    Complete requests:      10000
    Failed requests:        3544
       (Connect: 0, Receive: 0, Length: 3544, Exceptions: 0)
    Write errors:           0
    Keep-Alive requests:    10000
    Total transferred:      2276456 bytes
    HTML transferred:       106456 bytes
    Requests per second:    1585.78 [#/sec] (mean)
    Time per request:       5.045 [ms] (mean)
    Time per request:       0.631 [ms] (mean, across all concurrent requests)
    Transfer rate:          352.54 [Kbytes/sec] received

    Connection Times (ms)
                  min  mean[+/-sd] median   max
    Connect:        0    0   0.0      0       0
    Processing:     2    5   0.3      5       8
    Waiting:        2    5   0.3      5       8
    Total:          2    5   0.3      5       8

    Percentage of the requests served within a certain time (ms)
      50%      5
      66%      5
      75%      5
      80%      5
      90%      5
      95%      6
      98%      6
      99%      6
     100%      8 (longest request)

